How to Use Smooth Images with 16 Bit Color Depth Applying Dithering
I’m sure that you have already faced with the problem when you have only 16-bit color depth and an image with smooth color fades. The 65k colors might be not enough to show the similar colors properly, but ugly stripes will appear. Fortunately, there is a solution which is called dithering. In this post, I will show you how to apply dithering on higher color depth images to get a better result at 16-bit color depth.
What is dithering?
Dithering is an image (and audio) processing method. It gives the effect that your image has greater color depth by manipulating pixels by a smart algorithm. Both of the images below are using only 256 colors but the right one is dithered. The difference in the quality is clear. Working form the same color palette (same number of colors) the dithered image looks much better.
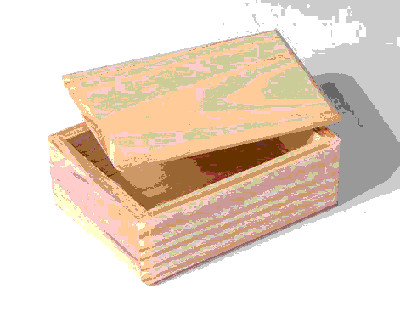 8 bit (256 colors) image without dithering
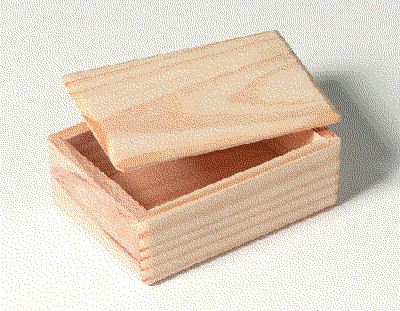 8 bit (256 colors) image with dithering
Why use dithering?
On embedded systems 16-bit color depth is very common because it needs much less “wire” and memory than 24-bit colors and usually there is no or only minor difference in quality. The exception is the subtle color fades where simply there is not enough color to create a smooth fade. And here comes the dithering. If you use a dithered image you will get a much better result on lower color depth. All this can be done in compile time without performance loss.
What does dithering do in the practice?
To understand dithering firstly figure out how to create a gray color from only black and white. It’s simple just put a black pixel and a white after it. On average it will result from a gray color. To make the color lighter use more white pixel, and to make it darker use more black pixels.
It sounds simple but real algorithms are counting the error after putting pixels and apply a different “tricks” to avoid artifacts.
To learn more about the dithering algorithms I suggest this article: Image Dithering: Eleven Algorithms and Source Code
Original 24 bit (RGB888) image
 The original image with 24 bit color depth has got smooth color gradients.
Original enlarged
 Even if we are looking an enlarged part it seems perfect.
16 bit (RGB565) image
 If we convert image to 16 bit color depth ugly stripes appear because this color depth can’t show enough colors.
16 bit enlarged
 The stripes are clearly visible on the enlarged image too.
16 bit (RGB565) image with Dithering
 The dithered image with also 16 bit color depth looks almost the same like the original. However if you look it carefully you can also notice a few stripes but it is much better then the non-dithered version.
16 bit dithered enlarge
 The enlarged dithered image looks a little bit noisy.
How to dither your 24 bit images in RGB565 format?
The most simple way to dither your high color depth image to 16 bit is using a photo editor software. Here are two suggestions:
GIMP
GIMP is a free and cross platform software to manipulate images.
GIMP needs a plugin to make this kind of dithering. I used this one: http://registry.gimp.org/node/25275. I just followed the steps in the description to add the plugin to GIMP. If because of any reason the link above become broken you can also download the plugin from here. And the steps to add the plugin:
- Copy the dither16bit.scm file to the script directory of GIMP (On Linux: /home/user/.gimp-*/scripts)
- Copy the the 4 Grayscale palette files (.gpl) file to the palette directory of GIMP (On Linux: /home/user/.gimp-/palettes)
To make dithering open GIMP and click Image->Mode->Dither to RGB565 and save the new image.
Image Magick
[Image Magick] is very complex and versatile a command line tool. It knows a lot of algorithms manipulates you image.
To use it, in a terminal type: convert image_in.jpg -ordered-dither o8x8,32,64,32 image_out.jpg
How to dither an image to 1 bit (black and white)?
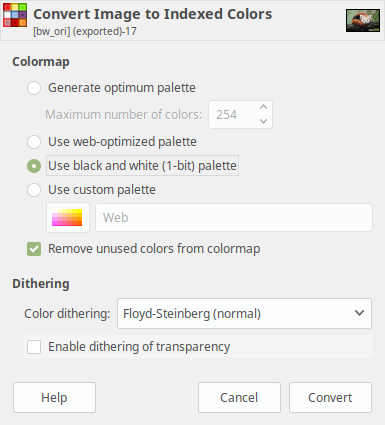
You can use GIMP to create black and white dithered image too by selecting Image->Mode->Indexed and Use black and white color palette as Colormap and Floyed-Steinber as Color Dithering. It is useful if you have a high DPI monochrome display.
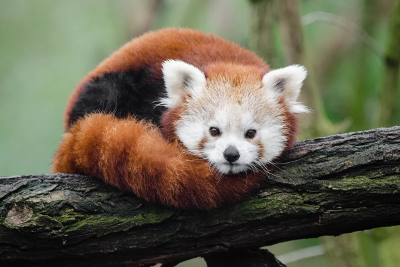
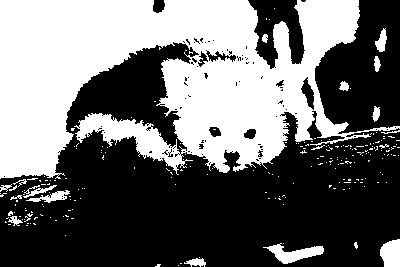
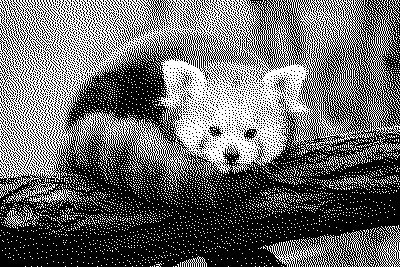
Here is an example to see the difference between the original, non-dithered and dithered images:
How to use dithered image in LittlevGL?
Once you have a dithered image you can use it LittlevGL as other images. Just upload it to the Online Image Converter tool which creates a C array from a BMP, JPG or PNG image. Then you need to copy the result C file to you project and use it with an Image obejct.
Conclusion
Now you know how to improve the quality of your 16-bit images using dithering. I hope you found this article useful!
Here you find other Tutorials about embedded GUI. Check them out!